Welcome to our comprehensive guide on replacing a tire valve stem. Whether you’re a seasoned DIY enthusiast or a beginner in auto maintenance, understanding the process of how to replace tire valve stem is essential for maintaining optimal tire performance. In this step-by-step guide, we will walk you through the entire process, from identifying signs that indicate replacement is needed to installing a new valve stem.
Regular tire maintenance is crucial for ensuring safety on the road and extending the lifespan of your tires. By learning how to replace a tire valve stem, you can take control of your tire maintenance and save money by performing the replacement at home.
Key Takeaways:
- Regular tire maintenance, including valve stem replacement, is important for optimal tire performance and safety.
- Identify signs that your tire valve stem needs replacement, such as air leakage or difficulty maintaining tire pressure.
- Gather the essential tools and materials for valve stem replacement.
- Follow a step-by-step guide to remove the old valve stem and install a new one.
- Reinflate the tire and check for any leaks using a water and soap solution.
Understanding the Basics of Tire Valve Stems
Table of Contents
ToggleIn this section, we will delve into the essential knowledge about tire valve stems. Understanding the purpose and components of a valve stem is crucial for maintaining optimal tire performance. Additionally, we will discuss the signs that indicate when it’s time to replace a faulty valve stem.
Learn more about the top most expensive tire brand in the world
What Is a Tire Valve Stem?
A tire valve stem is a small component that connects the tire to the air pressure system. It acts as a pathway for inflating and deflating the tire. The valve stem is typically made of rubber or metal and features a cap to protect it from dust and debris.
To provide inflation and deflation flexibility, valve stems have a valve core that can be accessed by removing the cap. Under normal conditions, the valve core remains sealed to prevent air leakage.
Components of a Valve Stem
A valve stem consists of several key components:
- Valve Core: This essential part is responsible for regulating air flow in and out of the tire. It ensures proper tire inflation and maintains consistent air pressure.
- Rubber Grommet: The rubber grommet provides an airtight seal between the valve stem and the tire, preventing air leakage.
- Base: The base of the valve stem is the part that joins it to the wheel rim. It must be securely fitted to maintain stability.
- Cap: The cap protects the valve stem from dirt, debris, and moisture. It plays a crucial role in preventing air leakage and maintaining tire pressure.
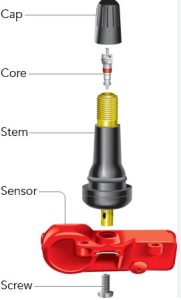
Together, these components work together to ensure proper tire inflation and prevent air leaks.
Learn more about best all season tire for Subaru outback
Signs Your Tire Valve Stem Needs Replacement
Over time, tire valve stems can wear out or become damaged, compromising their functionality. Here are some signs that indicate a faulty valve stem:
- Air Leakage: If you notice that your tire is losing air even after inflation, it could be due to a faulty valve stem. Air leakage is a clear indication that the valve stem needs replacement.
- Difficulty Maintaining Tire Pressure: If you constantly need to top up your tire’s air pressure, it may be a sign of a faulty valve stem. A properly functioning valve stem should maintain consistent tire pressure.
- Corrosion or Damage: Inspect the valve stem for any signs of corrosion or physical damage. Cracks, cuts, or bends in the valve stem are clear indicators that it needs to be replaced.
- Stiff Valve Cap: If the valve cap is difficult to remove or tighten, it could be a sign of a damaged valve stem. The cap should move freely without resistance.
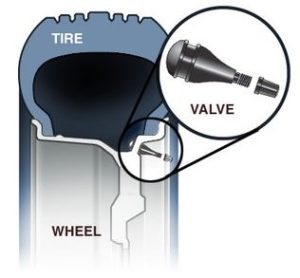
Recognizing these signs of a faulty valve stem is vital for maintaining tire safety and performance.
Tools and Materials Needed for Valve Stem Replacement
Gearing up with the right tools and materials is crucial for a successful valve stem replacement. Make sure to gather the following essential items before starting the process:
Gathering the Essential Tools
- Lug nut wrench
- Jack
- Valve stem removal tool
- Pliers
- Tire pressure gauge
- Tire valve core tool
- Tire sealant
- Tire patch kit
- Tire lubricant
- Tire inflator or air compressor
Having these tools at hand will ensure that you’re fully equipped to remove the old valve stem and replace it with a new one efficiently.
Finding the Right Replacement Valve Stem
Choosing the right replacement valve stem is essential for a proper fit and optimal tire performance. Here are a few factors to consider when selecting a replacement:
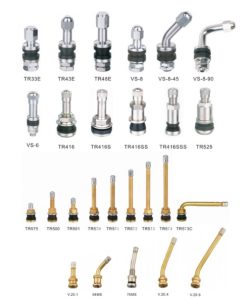
- Tire type: Different tire types, such as tubeless or tube-type, may require specific valve stems. Ensure that you choose a valve stem compatible with your tire.
- Vehicle specifications: Check your vehicle’s manual or consult a trusted mechanic to determine the correct valve stem specifications, including size and thread type.
- Valve stem type: Valve stems come in various types, such as Schrader or Presta valves. Make sure to choose a valve stem that matches the existing valve type on your tire.
- Quality: Opt for high-quality valve stems that are durable and reliable to ensure long-term performance.
By considering these factors, you can make an informed decision when selecting the right replacement valve stem for your tire.

| Tool | Description |
|---|---|
| Lug nut wrench | A tool used to loosen and tighten the lug nuts on the wheel. |
| Jack | A device used to lift the vehicle and provide clearance for tire removal. |
| Valve stem removal tool | A tool specifically designed to remove the old valve stem from the tire. |
| Pliers | Used for gripping and manipulating small parts during the valve stem replacement process. |
| Tire pressure gauge | An instrument used to measure the air pressure inside the tire. |
| Tire valve core tool | A tool used to remove and install the valve core, which controls air flow in the valve stem. |
| Tire sealant | A substance applied to the inside of the tire to seal and prevent air leakage. |
| Tire patch kit | A kit containing materials for repairing small punctures in the tire. |
| Tire lubricant | A lubricating substance used to ease the installation of the new valve stem. |
| Tire inflator or air compressor | A device used to inflate the tire to the recommended air pressure. |
How to replace the tire valve stem -Step-by-Step Guide
Replacing a tire valve stem is a straightforward process that can be done at home with the right tools and a little know-how. Follow this step-by-step guide to successfully replace a tire valve stem and ensure optimal tire performance:
Loosen the Lug Nuts:
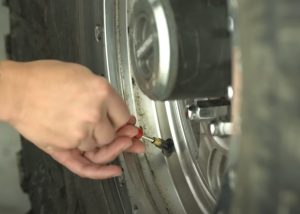
Before lifting the vehicle, use a lug nut wrench to slightly loosen the lug nuts on the tire where the valve stem needs to be replaced. This will make it easier to remove the tire later on.
Jack Up the Vehicle:

Use a jack to elevate the vehicle until the tire that needs the valve stem replacement is off the ground. Place jack stands securely to keep the vehicle stable throughout the process.
Remove the Tire:

Completely remove the lug nuts and gently pull the tire off the wheel hub. Set it aside in a safe location where it won’t roll away.
Deflate the Tire Completely:
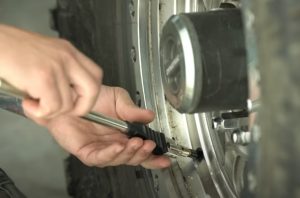
Using a valve stem removal tool or a small tool with a pointed end, press down on the valve core to release all the air from the tire. Ensure that the tire is fully deflated before proceeding.
Remove the Old Valve Stem:
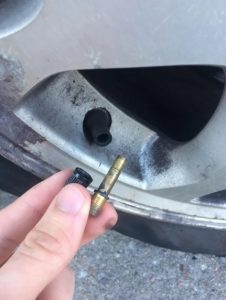
Locate the valve stem and use a valve stem removal tool to unscrew and remove the old valve stem from the tire. Discard the old valve stem properly.
Install the New Valve Stem:
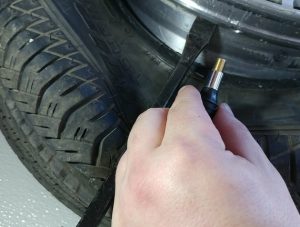
Take the new valve stem and insert it into the valve stem hole on the tire. Use a valve stem installation tool or a pair of pliers to tighten the valve stem securely in place.
Reinflate the Tire:
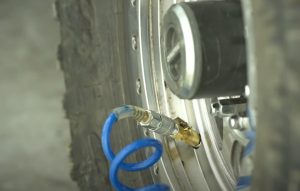
Attach an air compressor or use a tire inflator to reinflate the tire to the recommended air pressure level. Refer to the manufacturer’s specifications for the correct tire pressure.
Mount the Tire Back:

Carefully lift the tire and align it with the wheel hub. Push the tire onto the hub until it is fully seated. Ensure that the valve stem is pointing outwards and aligns with the valve hole in the wheel.
Tighten the Lug Nuts:
Securely tighten the lug nuts on the wheel hub in a star pattern to ensure even tightening. Use a lug nut wrench to tighten the lug nuts until they are snug.

By following these step-by-step instructions, you can replace a tire valve stem with ease. Remember to exercise caution and always prioritize safety when working on your vehicle’s tires. Regular maintenance and proper valve stem replacement can contribute to safer and smoother rides.
Re-inflating the Tire and Checking for Leaks
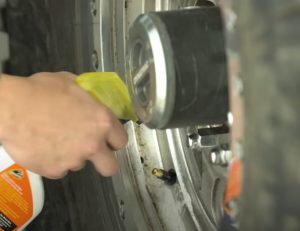
After successfully replacing the tire valve stem, it’s crucial to re-inflate the tire properly to ensure optimal performance and safety. Additionally, checking for leaks is an essential step in maintaining the tire’s condition. Follow the steps below to re-inflate the tire and detect any potential leaks:
Steps for Tire Re-inflation
- Place the tire under the vehicle or in a suitable area where it can be re-inflated.
- Connect an air compressor to the valve stem and secure it tightly.
- Refer to the vehicle’s manual or tire sidewall for the recommended PSI (pounds per square inch) for proper tire inflation.
- Gradually inflate the tire, monitoring the pressure gauge on the air compressor.
- Once the tire reaches the recommended PSI, disconnect the air compressor from the valve stem.
How to Check the Tire for Leaks
- Mix water and soap in a spray bottle to create a soapy solution.
- Spray the soapy solution onto the valve stem and around the tire bead where it makes contact with the rim.
- Observe if there are any bubbles forming, indicating a potential leak. Pay close attention to the valve stem area.
- If bubbles are present, it signifies a leak. In such cases, further inspection or professional assistance may be required to address the issue.
- If no bubbles are visible, it indicates that the tire is properly sealed and there are no apparent leaks.
Regularly checking tire pressure and conducting leak tests is crucial for maintaining tire condition and ensuring optimal vehicle performance. By following these steps, you can confidently re-inflate the tire after a valve stem replacement and identify any leaks that may require attention.

Conclusion
Regular tire maintenance is essential to ensuring the safety and optimal performance of your vehicle. One important aspect of tire maintenance is the replacement of the tire valve stem. By following the step-by-step guide provided in this article, you have learned how to replace a tire valve stem yourself, saving time and money.
Remember, a faulty tire valve stem can lead to air leakage and difficulty maintaining proper tire pressure, which can compromise your safety on the road. By regularly inspecting your tire valve stems and replacing them when necessary, you can avoid potential accidents and breakdowns.
Make it a habit to check your tires regularly for any signs of wear and tear, including the condition of the valve stems. Proper tire maintenance, including valve stem replacement, will not only ensure your safety but also enhance the longevity of your tires. So, take charge of your vehicle’s maintenance, and prioritize tire care for a smoother and safer driving experience.
FAQ
How do I know when it’s time to replace a tire valve stem?
Signs that indicate a tire valve stem needs replacement include air leakage from the valve stem, difficulty maintaining tire pressure, and visible damage or wear on the valve stem.
What tools and materials do I need to replace a tire valve stem?
Essential tools for a tire valve stem replacement include a lug nut wrench, jack, valve stem removal tool, and an air compressor. The materials needed include a new valve stem and a soap and water solution for leak testing.
How do I replace a tire valve stem step by step?
The process involves loosening the lug nuts, jacking up the vehicle, removing the tire, deflating the tire completely, removing the old valve stem, installing the new valve stem, re-inflating the tire, mounting the tire back, and tightening the lug nuts.
How do I re-inflate the tire after valve stem replacement?
To re-inflate the tire, use an air compressor to pump air into the tire until it reaches the recommended pressure. Then, check for any leaks by applying a soap and water solution to the valve stem and observing for bubbles.
Why is tire valve stem replacement important?
Tire valve stem replacement is crucial for maintaining proper air pressure in the tire, preventing air leakage, and ensuring optimal tire performance and safety on the road.

